How to Decide on the Best RAID Configuration For You

A common question we get asked here at 45 Drives is, “What RAID should I use with my Storinator?”
Our answer: “What are you trying to do?”
Choosing which RAID level is right for your application requires some thought into what is most important for your storage solution. Is it performance, redundancy or storage efficiency? In other words, do you need speed, safety or the most space possible?
This post will briefly describe common configurations and how each can meet the criteria mentioned above. Please note I will discuss RAID levels as they are defined by Linux software RAID “mdadm”. For other implementations, such ZFS RAID, the majority of this post will hold true; however, there are some differences when you dig into the details. These will be addressed in a post to come! In the meantime, check out the RAIDZ section of our configuration page for more information.
Standard RAID Levels
Let’s start with the basics, just to get them out of the way. There are a few different RAID configs available, but I am only going to discuss the three that are commonly used: RAID 0, RAID 1 and RAID 6. (But if you want more information, see Standard RAID Levels).
A RAID 0, often called a “stripe,” combines disks into one volume by striping the data across all the disks in the array. Since you can pull files off of the volume in parallel, there is a HUGE performance gain as well as the benefit of 100% storage efficiency. The caveat, however, is since all the data is spread across multiple disks, if one disk fails, you will lose EVERYTHING. This is why one of our friends in the video production industry likes to call RAID 0 the “Scary RAID”. Typically, a RAID 0 is not used alone in production environments, as the risk of data loss usually trumps the speed and storage benefits.

A RAID 1 is often called a “mirror” – it mirrors data across (typically) two disks. You can create 3 or 4 disk mirrors if you want to get fancy, but I won’t discuss that here, as it is more useful for boot drives rather than data disks (let us know if you’d like a blog post on that in the future). RAID 1 gives you peace of mind knowing that you always have a complete copy of your data disk should one fail, and short rebuild times if one ever does. The caveat this time around is that storage efficiency is only 50% of raw disk space, and there is no performance benefit like the RAID 0. In fact, there is even a small write penalty as every time something needs to be written to the array, it has to write it twice, once to both disks.

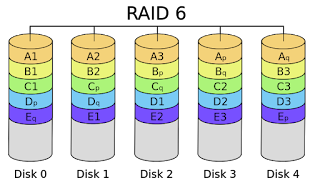
A RAID 6 is also known as “double parity RAID.” It uses a combination of striping data and parity across all of the disks in the array. This has the benefit of striped read performance and redundancy, meaning you can lose up to 2 disks in the array and still be able to rebuild lost data. The major caveat is that there can be a significant write penalty (although, bear in mind, the Storinator’s read/write performance is pretty powerful, so the penalties may not be a huge concern).
This write penalty arises from the way the data and parity is laid out across the disks. One write operation requires the volume to read the data, read the parity, read the second parity, then write the new data, write first new parity and then the second parity. This means for every one write operation, the underlying volume has to do 6 IOs. Another issue is that the time for initial sync and rebuild can become large as the array size increases (for example, once you get around 100TB in an array, initial sync and rebuild times can get in the 20-hour range pretty easily). This bottleneck arises from computation power, since Linux RAID “mdadm” can only utilize one core of a CPU. Storage efficiency in a RAID 6 depends on how many disks you have in the array. Since two disks must always be used as parity, as you increase the number of disks, the penalty becomes less noticeable. The following equation represents RAID 6 storage efficiency in terms of number of disks in the array (n).


Personally, I like to stay away from making a single RAID 6 too large as rebuild times will start to get out of control. Also, statistically,you are prone to more failures as the number of disks rise and double parity may no longer cut it. In the section below, I discuss how to avoid this issue by creating multiple smaller RAID 6s and striping them.
Nested RAID Levels
Building off the basics, what is typically seen in the real world is nested RAID levels; for example, a common configuration would be a RAID 10.
A RAID 10 can be thought of as a stripe of mirrors – you get the redundancy, since each disk has an exact clone, as well as the improved performance since you have multiple mirrors in a stripe. Only downside to a RAID 10 is the storage efficiency is 50%, and it shares the same 2 IOs for every 1 write penalty, like a simple RAID 1. For more information and how to build one check out our RAID 10 wiki section.

Another interesting nested RAID is a RAID 60, which can be thought of as a stripe of RAID 6s. You get the solid redundancy and storage efficiency of a RAID 6 along with better performance, depending how many you stripe together. In fact, depending on how many RAID 6s you put into the stripe, the amount of drives that can fail before total loss increases to m*2 where m is the number of RAID 6s in the stripe. Keep in mind though, as you increase the number of arrays in a stripe, the space efficiency will decrease. The following equation gives the storage efficiency of a RAID 60 in terms of total number of drives in the system (N) and the number of RAID 6s in the stripe (m). Our wiki has more information and instructions on how to build RAID 60.


CONCLUSIONS
To tie things back into how I began, now that we’ve discussed various RAID levels and their pros and cons, we can make some conclusions to determine what the best choice is for your application.
Performance:
If you need performance above all else and you don’t care about losing data because proper backups are in place, RAID 0 is the best choice hands down. There is nothing faster than a RAID 0 configuration and you get to use 100% of your raw storage.
If you need solid performance but also need a level of redundancy, RAID 10 is the best way to go. Keep in mind that you will lose half your usable storage, so plan accordingly!
Redundancy:
If redundancy is most important to you, you will be safe choosing either a RAID 10 or a RAID 60. It is important to remember when considering redundancy that a RAID 60 can survive up to two disk failures per array, while a RAID 10 will fail completely if you lose two disks from the same mirror. If you are still unsure, the deciding factor here is how much storage you need the pod to provide. If you need a lot of storage, go the RAID 60 route. If you have ample amounts of storage and aren’t worried about maxing out, take the performance benefit of the RAID 10.
For a RAID 60, you will have 6 IO for every one write IO, while with a RAID 10 you only have 2 IOs for every 1 write IO. Therefore, a RAID 10 is faster than a RAID 60.
Perspective on Speed
When talking about write penalties, keep in mind that the Storinator is a powerful machine with impressive read/write speeds, so even if the RAID you go with has a greater write penalty, you will be more than satisfied with your storage pod’s performance. For more information, please review our RAID performance levels.
Space Efficiency:
If packing the pod as full as possible is the most important thing to you, you will most likely want to use a RAID 60 with no more than 3 arrays in the stripe (4 in a XL60, and 2 in a Q30). This will give you a storage efficiency of 86%. You could also use a RAID 0 and get 100% of raw space, but this is really not recommended unless you have solid backup procedure to ensure you don’t lose any data.
I hope this will help ease the decision of picking the right RAID configuration and don’t forget to check our technical wiki for more information, especially the configuration page detailing how to build all the RAIDs mentioned in post as well as some performance numbers.
What are your thoughts on the ideal RAID? What has worked best for your storage needs? Sound off in the comments!


